Showing posts with label Office 365. Show all posts

How To Get Microsoft Graph API Token Using PowerShell

UPDATE: This is now available as a module
https://www.powershellgallery.com/packages/Office365TokenGet

One of the things that I had difficulty with when I was starting to work with MS Graph API was how to get authenticated. So here is a post that hopefully would help others start their coding with MS Graph API.

This simple function helps you get a pre-authenticated token.

The Function Code


The Function in Action


Note that I already have an App registered in Azure AD. This means that I already have the Client ID, Client Secret, and the Tenant Domain.

I will not cover the Azure App Registration in this post.

Define Required Parameter Values with Variables


Acquire Token


Retrieve User Profile


That's the end of this simple demonstration on how to get MSGraph API Token using PowerShell.

Share:

Office 365 Service Health Monitor using Office 365 Management API v2 and PowerShell

NOTES:
May 30, 2019 - Updated post to show new App Registration experience.

This script demonstrates how to retrieve the Office 365 Service Health Data using the Office 365 Management API, and send the email report using Microsoft Graph API.

The logic flow is simple:
  1. Retrieve Office 365 Service Health Record (this is the only action done during the first run, saved to new.csv)
  2. Read Old Records from the file (old.csv)
  3. Compare retrieved records with old records (new.csv VS old.csv)
  4. Report if there are new or updated records (updated.csv)
You may want to have this running as a scheduled task at an interval you prefer.

What is covered by this post?

  • App Registration in Azure AD
  • Configuring the Script
  • Running the Script and Generating Outputs / Reports

What is NOT covered by this post?

This post does not cover the “How-To” of the said APIs, because they can already be found by following these links:

Requirements

  • Application Registration in Azure AD (Application ID + Key + Permissions)
  • Exchange Online Mailbox (User or Shared Mailbox, for sending reports)

Download and Change Logs

v1.5 (latest) - https://github.com/junecastillote/Get-O365HealthReport
  • code cleanup
  • added code to cater to the new App Registration Keys special characters
v1.4
  • code cleanup
  • fixed JSON conversion for the email report
v1.3
  • added "exclusion" feature. (requested from this issue)
  • the exclusions.csv file inside the \resource folder can now be used to exclude workloads from the report.
v1.2
  • Modified to also check the changes in "Status" to trigger an update alert. (eg. Service Degradation to Service Restored). This is because I observed that some events' Last Updated Time does not change but the Status change which is not getting captured by the previous script.
v1.1
  • Added “organizationName” field in config.xml
  • Removed “mailSubject” field from config.xml
  • Send one email per event (alerts are no longer consolidated in one single email)
v1.0

  • Initial build


App Registration

Note: Your account must be a Global Admin
  • Go to Azure Active Directory > App Registrations
 
  • Click New Registration 
  • Fill out the Name, Supported account types and Redirect URI as shown below, then click Create


  • Then click Register
  • Once the App is registered, copy the Application ID for later use.
  • Click Certificates and Secrets
  • Click New client secret

  • Type in the Description and select the expiration for your key, then click Add
  • After clicking Add, the Key will be generated. You must copy this key value because it will not be shown again.
  • Go to API permissions and make sure you add these permissions 

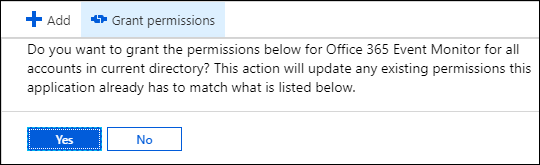
  • Once Required Permissions are added, click Grant admin consent..

  • Click Yes
 

Script Configuration

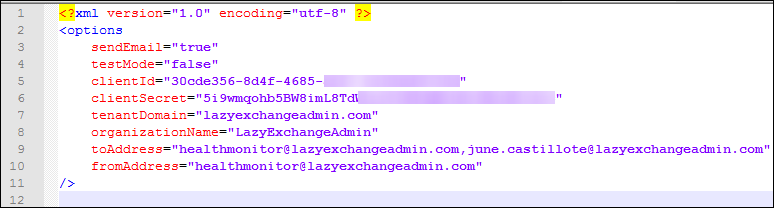
Open the config.xml file and edit the values as necessary like the example below:


sendEmail – set this to TRUE or FALSE depending on whether you want the report sent thru email.
testMode – set this to TRUE or FALSE depending on whether you want to run in test mode or not. Test Mode will treat ALL items retrieved from the service health dashboard as NEW or UPDATE. When you’re ready to put this script in production, set this to FALSE
clientID – this is the Application ID you copied from the App Registration in Azure AD
clientSecret – this is the Key you copied from the App Registration in Azure AD
tenantDomain – this is your Office 365 Tenant Domain
toAddress – your intended recipients of the report, separate multiple recipients with a comma with no spaces.
fromAddress – the primary smtp address of the Shared Mailbox or User Mailbox you want to use for sending the email report.
organizationName – the name of your organization to reflect in the alert.

How to Exclude Workloads from the Report

Note: This is applicable only from version 1.3.
  1. Open the \resources\exclusions.csv file
  2. Change the Excluded value of the workload you want to exclude to 1 (0=include, 1=include)

Running the Script

IMPORTANT: In the first run, whether in Test Mode or not, will only generate the data that will be needed for future run comparisons.
In this example, the script is in run Test Mode.

Sample Output

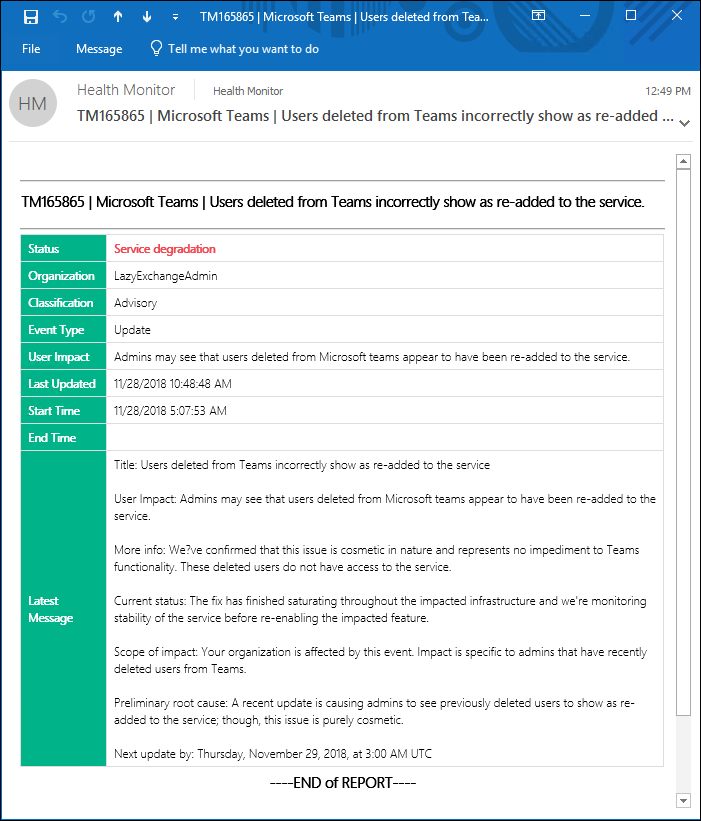
Email


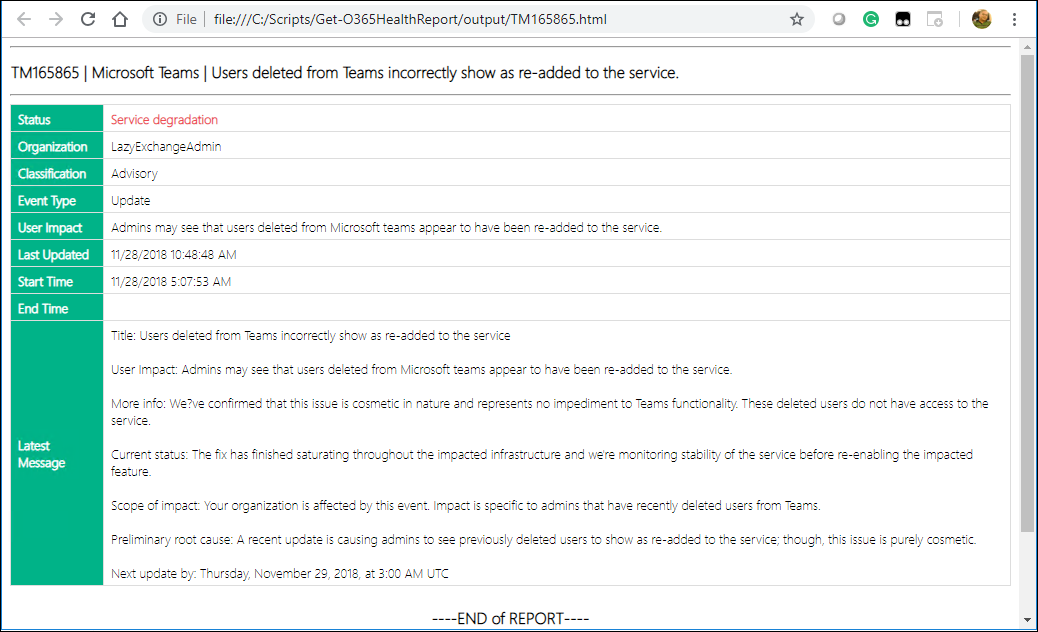
HTML

mRemoteNG_2018-11-28_12-52-22


This script is functional, but I’m sure there can be many improvements. Or perhaps someone else has accomplished this differently. So please feel free to comment or modify and improve, just please don’t forget to credit the original source.
Share:

Office 365 Mailbox Forwarding Rules Report using PowerShell

Being on top of who’s forwarding messages to who’s email, especially those being forwarded to external domains is essential to email security for administrators. Phishing attacks can leave your users’ mailboxes prone to data exfiltration by way of forwarding emails, and so being able to regularly review and audit mailbox forwarding rules is beneficial to protecting your company’s data.
This script can be used to export a report of all the forward/redirect rules present in all user mailboxes.


Download Link

https://github.com/junecastillote/Export-ExoMailForwardRules


Requirements

  • Must have an Office 365 account that is assigned at least an Exchange Administrator role whose credentials will be used to connect to Office 365 PowerShell.
    • It is important that the account is not MFA enabled as the script operates by paging and re-authenticates to Office 365 page.
  • Must have a mailbox to be able to send the email report using Office 365 SMTP Relay. This could be the Service Account you’re using for the session, or a Shared Mailbox that the Service Account has Send As permission to. If you do not plan to send the report thru email, then you can disregard this requirement.


How to use

Setup Office 365 Credentials

  • Open PowerShell and change to the directory where the script is saved (eg. C:\Scripts\Export-ExoMailForwardRules)
  • Run this command:
  • Get-Credential | Export-CliXml Office365StoredCredential.xml

  • This saves the encrypted credential in the same folder


Modify Variables

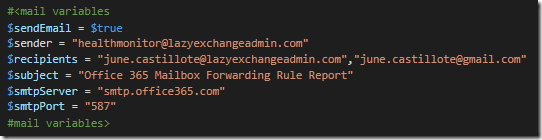
Email Settings


NOTE: The $sender value must be the actual email address of the service account or the shared mailbox used for sending the email report.

Paging

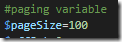
In cases where there are a large number of mailboxes to be processed, the Exchange Online PowerShell session may timeout/disconnect which would cause the script to fail. As a workaround, this script is configured to process the mailboxes in pages. By default, the page settings is set to 100 – which means after every 100 mailboxes processed, the script will re-establish and re-authenticate the PowerShell session. You can increase the page value but it is not recommended to set it too high.

Run the script

The script requires no parameters.


Output

CSV File
The csv file gets saved in the “\Reports” folder


Email

Share:

Enable Mailbox Auditing in Office 365 using PowerShell Script

One of the things that don’t happen automatically when provisioning an Office 365 Mailbox is getting the Mailbox Audit Enabled. This script can be run manually or by schedule to enable auditing on mailboxes.

Download Link

https://github.com/junecastillote/Enable-EXOMailboxAudit


Requirements

  • The Office 365 account to be used to run the script must be assigned an Exchange Administrator role in order to read and set mailbox audit settings.
  • Must have a mailbox to be able to send the email report using Office 365 SMTP Relay


Office 365 Credentials

This script uses an encrypted credential (XML). To store the credential:

  • Login to the Server/Computer using the account that will be used to run the script/task
  • Run this "Get-Credential | Export-CliXml Office365StoredCredential.xml"
  • Make sure that Office365StoredCredential.xml is in the same folder as the script.


Modify Variables

  • $sendEmail – set to $true or $false depending on whether you’d like the report to be send to email
  • $sender – This is the Sender Email Address – make sure this is the email address or the Office 365 Credential you are using for the script.
  • $recipients – These are the recipient addresses. To add multiple recipients, separate with comma.
  • $subject – This will show as the subject of the email report.


Run the script

The script requires no parameters.

Sample Report

Email

CSV

Share:

Monitor Azure AD LastDirSyncTime Using PowerShell

Office365Logo_256x254pxKnowing if your Directory Sync is up to date (or not) is crucial. Yes, you can glue your eyes to the Office 365 Portal or use commercial 3rd party monitoring tools to be alerted when your Directory Sync hasn’t updated for a certain period, or you can achieve the same goal using PowerShell. Microsoft was kind enough to include a LastDirSyncTime value when you run the Get-MsolCompanyInformation cmdlet. This way it can be programmatically checked and monitored by scheduling a script to run via task at an interval.

This script queries the LastDirSyncTime value, gets the current time, calculates the elapsed time, compares the difference against a set threshold and send an email alert if the threshold is breached.

Download Link

https://github.com/junecastillote/Get-O365DirSyncElapsed

  • 1.0 - April 19, 2018
    • Initial Release
  • 1.1 – August 20, 2018
    • Changed Time Stamp from UTC to Local Time, including the Time Zone ID
    • Required PowerShell v5.1


Requirements

  • PowerShell v5.1 (as of script v1.1)
  • MSOnline Module

Having the MSOnline Module installed is required for this to work. If you have PowerShell 5, it is easy to install. Just run Install-Package MSOnline and it should get you started. However for lower PS versions it may take a bit more to get MSOnline Module installed.

You can read up on MSOnline in detail from by following this link: Azure ActiveDirectory (MSOnline)

How To Use

Export Login Credentials to XML

The Username and Password are not saved inside the script, but rather it will import the login information from an encrypted XML file that you need to create beforehand.

Run this line in PowerShell, and it should save the credentials in an XML file.

Get-Credential | Export-CliXml ExOnlineStoredCredential.xml

Below is the sample content of the exported credentials.

Variables

Some variables that need to be modified depending on your requirement. The below example assumes that you are also using Exchange Online as relay. If you prefer to use a different SMTP relay, you will need to manually modify the script to conform with that.

In this example, only the following variables need to be modified.

$dirSyncElapsedTimeThreshold: The threshold in hours. If this is breached, the email alert will be sent.

$toAddress : The email addresses (separate with comma if more than one) of the intended recipients of the email alert.

$mailSubject: Your choice of message subject when the alert is sent.


Output

Once it’s all set up, just run the script from PowerShell. In the example below I set the threshold to ZERO (0) hours to trigger the alert. You should set a more realistic threshold in your production, obviously.

Then the email alert similar to this should be received.

Share:

Lync Server: Windows Fabric Logs, Disk Space Usage and Circular Logging


If you're not interested in reading the entire post, you can skip to the solution.

I know there have been many articles written and available for this topic. The reason I decided to still write this is to provide more explanation to possible questions that I found myself asking too when I first encountered this situation.

To understand what Windows Fabric is, what is does and how it works you may refer to this link -
"Understanding how Windows Fabric Works (with regards to Lync)"

There are two (2) User Defined Collector sets by default when a Lync Front-End server is deployed.
  • FabricLeaseLayerTraces
  • FabricTraces
You can find these in Performance Monitor


And the default location of the files generated by these data collectors is in C:\ProgramData\Windows Fabric\Fabric\log\Traces folder of each Front-End server.


The screenshot above is from one of the FE Servers in my lab setup. As you can see there are multiple files with approximately 128MB size each. What happens is that once the log file reached a new log file is generated with an incremental version.

eg.
fabric_traces_130374156934210426_007625.etl
fabric_traces_130374156934210426_007626.etl

And there is no limit as to how many of these files are created and can ultimately use up all available free space.

So the questions:

Why the 128MB Maximum file size?

It can be any size really, it's just that 128MB is the default when the data collector was created. You can simply check this using the logman utility.


What triggers the data collector to start?

A Task is scheduled to run at system startup which calls the "StartTracing.cmd" batch file.


Where can I find StartTracing.cmd and how is Task Scheduler able to call it when there is no relative path indicated in the Task?

A relative path (eg. C:\Windows\etc\whatever.exe) is not necessary because the file StartTracing.cmd is located in a path that is already defined in the Environment Variables.


Think of notepad for example which you can run by just typing notepad.exe without having to specify the path - that is the same concept.

How do I stop Windows Fabric from generating multiple log trace files?

The short answer is to turn on Circular Logging.

How? According to this article - http://flinchbot.com/2014/02/28/the-hidden-logs-that-could-crash-your-lync-servers/ - you can turn on circular logging by running this command (from an elevated command prompt)
Logman update trace FabricLeaseLayerTraces -f bincirc --cnf
I did use that article as a guide to enable the Circular Logging for both collectors, but somehow logman still kept on generating new files. I'm not saying that it is wrong, only that some parameters were not included to achieve my intended outcome.

So why didn't it work? That is because despite circular logging being turned on, the versioning is still enabled and the overwrite switch was not specified. In order to really turn on Circular Logging and keep the number of files to 1, this is what I did:

Solution
  • Run these commands in an elevated command prompt:
Logman update trace FabricLeaseLayerTraces -f bincirc --v --cnf -ow
Logman update trace FabricTraces -f bincirc --v --cnf -ow
What do the switches mean?

-f bincrc = turn on circular logging
--v = turn off file versioning
--cnf = turn off creation of new files
-ow = turn on overwrite of existing log file
  • Temporarily stop the logging
logman stop fabricleaselayertraces
logman stop fabrictraces
  • (Optional) Delete the existing log files 
del "C:\ProgramData\Windows Fabric\Fabric\log\Traces\*.*"
  • Start logging
logman start fabricleaselayertraces
logman start fabrictraces
The Result?

Notice that the versioning has been removed.


The same log files will be overwritten every time.

Also, you may want to consider increasing the maximum file size to a much higher value (like 2GB or higher) since there will only one log file for each data collector.
logman update fabrictraces -max 2048
logman update fabricleaselayertraces -max 2048
References:

https://technet.microsoft.com/en-us/library/bb490956.aspx
http://masteringlync.com/2013/10/29/understanding-how-windows-fabric-works/
http://flinchbot.com/2014/02/28/the-hidden-logs-that-could-crash-your-lync-servers/
https://social.technet.microsoft.com/wiki/contents/articles/29408.out-of-disk-space-in-lync-server-2013.aspx


Share:

Office 365 Service Health Check [.NET]

Tool Overview

The AlertO365 Tool provides a mechanism to check the Office 365 Service Status and Events programmatically eliminating the need to logon to the Office 365 Portal manually. This tool utilize the “Office 365 Service Communications API” as provided by Microsoft.

Reference: https://msdn.microsoft.com/en-us/library/office/dn776043.aspx

The Package

Files and Folders

Name
Type
Description
AlertO365.exe
File
Main executable (no parameter required)
AlertO365.exe.config
File
Contain configuration values used by the tool (XML format)
microsoft.exchange.servicestatus.tenantcommunications.data.dll
File
Office 365 Communications API
report
Folder
First Sub-Folder
Contains the HTML reports
images
Folder
Sub-Folder of the Report Folder
Logo1.png
File
First Logo in the report
Logo2.png
File
Second Logo in the report

Install and Configure

Installation
To use this tool, no special install utility is needed. Just extract/copy the package to any location on the computer/server.

In this example, the tool is extracted and placed under the C:\ drive

Image 1. Folder Structure

Configuration

The configuration file is AlertO365.exe.config, this is in XML format and can be edited using a normal text editor like Notepad.

Image 2. AlertO365.exe.config contents


Fields and Values

ServiceURL – No need to change this. This is a constant value provided by Microsoft in their API documentation

DomainNames – The Tenant Domain to be checked (enter only one domain)

UserName – Username used to authenticate to the Tenant Domain

Password – Password for the Tenant Domain credential

IsAOBO – No need to change this. The function related to this value is not (yet) implemented.

PastDays – Number of days with which the tool would query events for (i.e 1 for the past 1 day)

SenderAddress – Sender address of the email report

RecipientAddress – Recipient addresses of the email report. Separate with comma (,) for multiple recipients

SMTPServer – IP address or resolvable name of the SMTP relay used for sending the email report

MailSubject – The String to be used as Message Subject and Report Title

Company – The company or domain name that will appear in the report

SendViaEmail – Yes or No indicates whether the HTML output will be sent via email or not.

Other Configuration Items

The package contains two images namely Logo1.png and Logo2.png. These images are located under “\report\images” folder. Upon creation of the report, these images will be embedded in the email representing the Client/Company we managed and HP. Before putting the tool in production use, make sure to replace the Logo1.png file with the appropriate logo image for the client/company being managed.


Sample Report

Image 3. Sample HTML Report via Email

How to Use

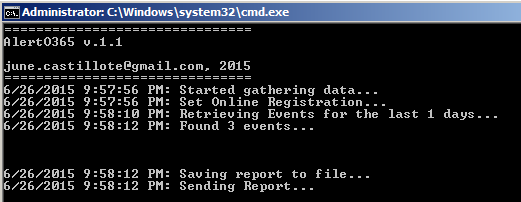
This is a console-only application which is best executed using the command shell (or can also be double-click in explorer – not recommended).


Can also be executed by Scheduled Task if preferred to run at certain interval (Daily, Hourly, Monthly..)


Image 4. Sample Tool Execution


Download and Source Code

AlertO365 1.2 - https://github.com/junecastillote/AlertO365

Note: Download contains source code. If you want to just get the binary output and associated files listed in "Files and Folders" section above, just go to the "bin/Release" folder.


Share:

Popular Posts

Powered by Blogger.