Showing posts with label monitoring. Show all posts

Office 365 Service Health Monitor using Office 365 Management API v2 and PowerShell

NOTES:
May 30, 2019 - Updated post to show new App Registration experience.

This script demonstrates how to retrieve the Office 365 Service Health Data using the Office 365 Management API, and send the email report using Microsoft Graph API.

The logic flow is simple:
  1. Retrieve Office 365 Service Health Record (this is the only action done during the first run, saved to new.csv)
  2. Read Old Records from the file (old.csv)
  3. Compare retrieved records with old records (new.csv VS old.csv)
  4. Report if there are new or updated records (updated.csv)
You may want to have this running as a scheduled task at an interval you prefer.

What is covered by this post?

  • App Registration in Azure AD
  • Configuring the Script
  • Running the Script and Generating Outputs / Reports

What is NOT covered by this post?

This post does not cover the “How-To” of the said APIs, because they can already be found by following these links:

Requirements

  • Application Registration in Azure AD (Application ID + Key + Permissions)
  • Exchange Online Mailbox (User or Shared Mailbox, for sending reports)

Download and Change Logs

v1.5 (latest) - https://github.com/junecastillote/Get-O365HealthReport
  • code cleanup
  • added code to cater to the new App Registration Keys special characters
v1.4
  • code cleanup
  • fixed JSON conversion for the email report
v1.3
  • added "exclusion" feature. (requested from this issue)
  • the exclusions.csv file inside the \resource folder can now be used to exclude workloads from the report.
v1.2
  • Modified to also check the changes in "Status" to trigger an update alert. (eg. Service Degradation to Service Restored). This is because I observed that some events' Last Updated Time does not change but the Status change which is not getting captured by the previous script.
v1.1
  • Added “organizationName” field in config.xml
  • Removed “mailSubject” field from config.xml
  • Send one email per event (alerts are no longer consolidated in one single email)
v1.0

  • Initial build


App Registration

Note: Your account must be a Global Admin
  • Go to Azure Active Directory > App Registrations
 
  • Click New Registration 
  • Fill out the Name, Supported account types and Redirect URI as shown below, then click Create


  • Then click Register
  • Once the App is registered, copy the Application ID for later use.
  • Click Certificates and Secrets
  • Click New client secret

  • Type in the Description and select the expiration for your key, then click Add
  • After clicking Add, the Key will be generated. You must copy this key value because it will not be shown again.
  • Go to API permissions and make sure you add these permissions 

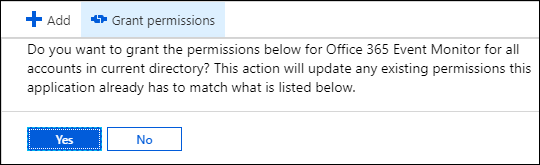
  • Once Required Permissions are added, click Grant admin consent..

  • Click Yes
 

Script Configuration

Open the config.xml file and edit the values as necessary like the example below:
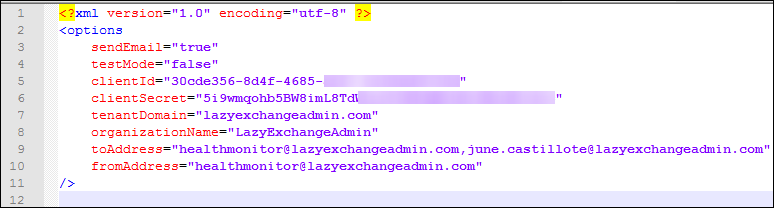

sendEmail – set this to TRUE or FALSE depending on whether you want the report sent thru email.
testMode – set this to TRUE or FALSE depending on whether you want to run in test mode or not. Test Mode will treat ALL items retrieved from the service health dashboard as NEW or UPDATE. When you’re ready to put this script in production, set this to FALSE
clientID – this is the Application ID you copied from the App Registration in Azure AD
clientSecret – this is the Key you copied from the App Registration in Azure AD
tenantDomain – this is your Office 365 Tenant Domain
toAddress – your intended recipients of the report, separate multiple recipients with a comma with no spaces.
fromAddress – the primary smtp address of the Shared Mailbox or User Mailbox you want to use for sending the email report.
organizationName – the name of your organization to reflect in the alert.

How to Exclude Workloads from the Report

Note: This is applicable only from version 1.3.
  1. Open the \resources\exclusions.csv file
  2. Change the Excluded value of the workload you want to exclude to 1 (0=include, 1=include)

Running the Script

IMPORTANT: In the first run, whether in Test Mode or not, will only generate the data that will be needed for future run comparisons.
In this example, the script is in run Test Mode.

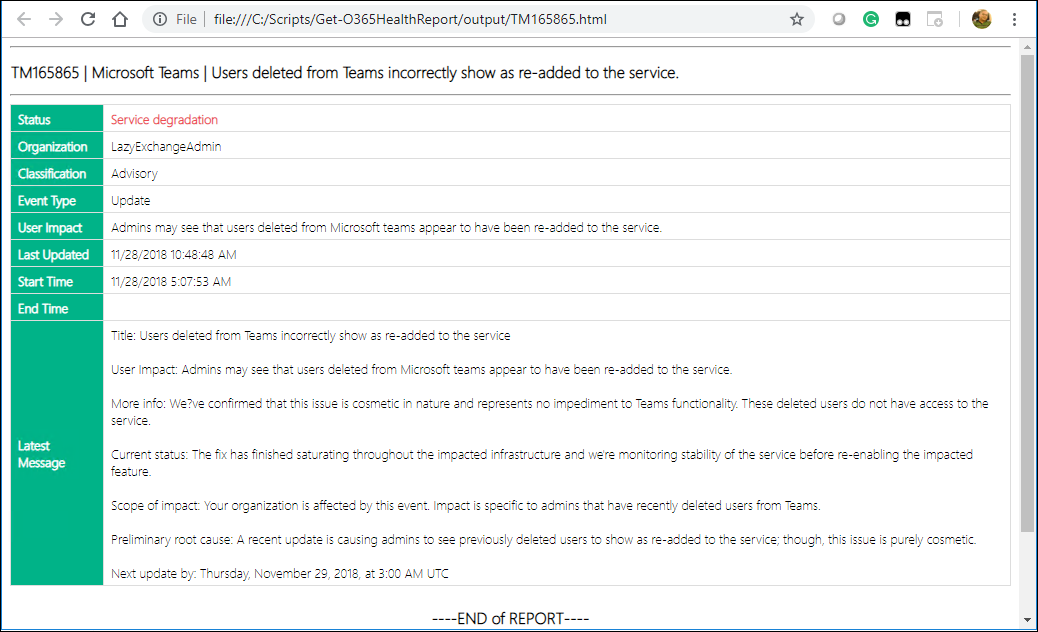
Sample Output
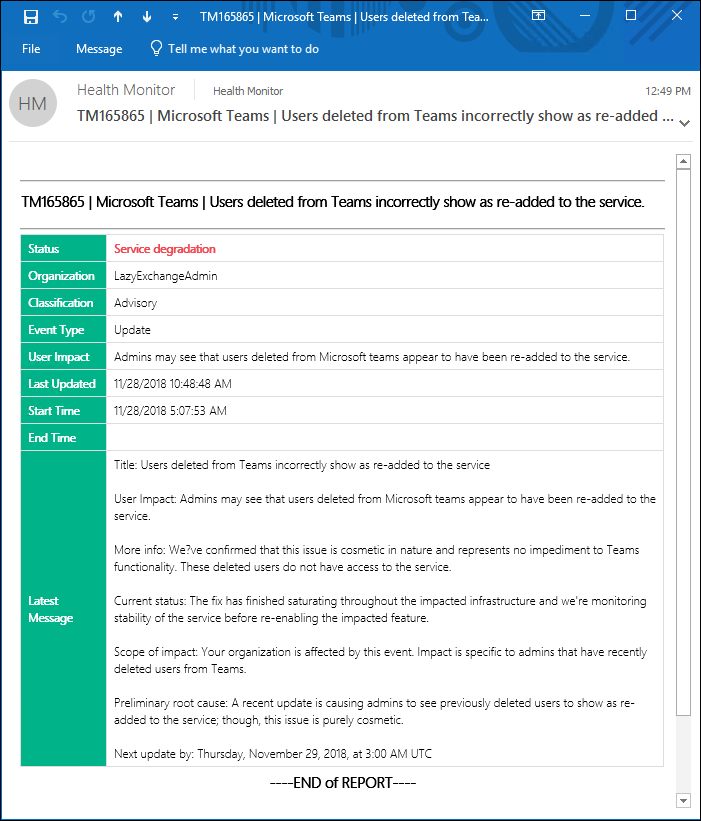
Email


HTML

mRemoteNG_2018-11-28_12-52-22


This script is functional, but I’m sure there can be many improvements. Or perhaps someone else has accomplished this differently. So please feel free to comment or modify and improve, just please don’t forget to credit the original source.
Share:

Monitoring Event IDs using PowerShell

I know that there are 3rd party commercial solutions that can monitor your servers for events IDs. But most of the time these solutions comes with features that you don’t really need and can cost some serious cash. Or maybe your company already have one in place but doesn’t always work as expected, and you could use a custom monitoring script as backup.

This script is for monitoring a list of events ids from local or remote computers. Can be configured to send the report by email or just write to an HTML output.

Download Link

https://github.com/junecastillote/PSEventMonitor

How to Use

Modify the CONFIG.XML file to confirm with your requirements

Modify the “application.txt” to contain the event IDs you need to monitor.

Then you can run the script, no parameters required because it reads the configuration from the XML file.

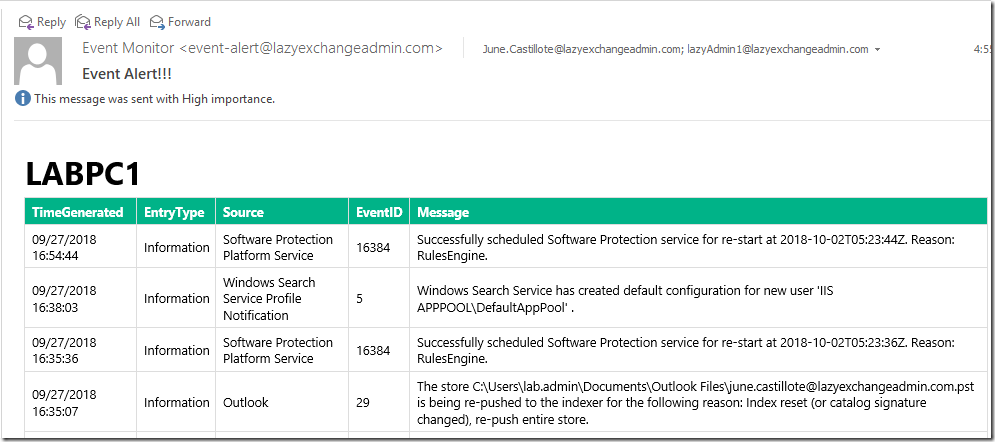
Sample Reports

HTML file

Email

Attribution:

This work is based on the script from this link.

Share:

Generate DNS MX Record Report using PowerShell

When you manage an email system, you’re sure to deal with MX records, and sometimes it is good to be able to generate a report of all the DNS MX Records for your domains to monitor their validity or availability. Being caught by surprise as your MX records go missing resulting in incoming mail delivery failures is never good.
This script can query a list of domains for their MX records, and generate a report which can be also sent as an email. Depending on your purpose, you can just run it manually or setup a task to run the script at an interval or daily schedule.

Requirements

This script requires PowerShell version 5.1

How to Install

From GitHub Repository

You can download the latest version of the script from this link, and just save it in you preferred folder.
https://github.com/junecastillote/Get-MXReport

From PS Gallery

This script can be installed from PSGallery by running this command:
Install-Script Get-MXReport –Scope AllUsers
Once completed, the script will be installed in “C:\Program Files\WindowsPowerShell\Scripts” by default, and is added to the PATH.

How to Use

Get-MXReport.ps1
[-domains] <string[]>
[-outputDirectory] <string>
[[-nameServer] <string>]
[[-logDirectory] <string>]
[[-headerPrefix] <string>]
[[-sendEmail] <string>]
[[-sender] <string>]
[[-recipients] <string[]>]
[[-smtpServer] <string>]
[[-smtpPort] <string>]
[[-smtpCredential] <pscredential>]
[-smtpServerRequiresAuthentication]
[-smtpSSL]
[-attachCSVReport]
[<CommonParameters>]

Examples

EXAMPLE 1

Get-MXReport.ps1 –domains “gmail.com”,”lazyexchangeadmin.com” –outputDirectory C:\Scripts\output
This example queries the MX record for the specified domains and save the HTML and CSV report to the specified folder

EXAMPLE 2

$domainsList = “gmail.com”,”yahoo.com”,”lazyexchangeadmin.com”
Get-MXReport.ps1 –domains $domainsList –outputDirectory C:\Scripts\outputsendEmail OnError –sender sender@domain.com –recipients recipient1@domain.com,recipient2@domain.com –smtpServer smtp.server.com –smtpPort 25 –AttachCSVReport
This example queries the MX records, save the reports to the specified folder and if a failed lookup is logged, it will send the email report to the specified recipient using a non-authenticated SMTP relay and the CSV report is attached to the email.

EXAMPLE 3

$domainsList = “gmail.com”,”yahoo.com”,”lazyexchangeadmin.com”
$smtpCredential = (Get-Credential)
Get-MXReport.ps1 –domains $domainsList –outputDirectory C:\Scripts\outputsendEmail OnError –sender sender@domain.com –recipients recipient1@domain.com,recipient2@domain.com –smtpServer smtp.office365.com –smtpPort 587 –smtpSSL –AttachCSVReport –smtpServerRequiresAuthentication –smtpCredential $smtpCredential
This example queries the MX records, save the reports to the specified folder and if a failed lookup is logged, it will send the email report to the specified recipient using an authenticated SMTP relay via Office 365, port 587 with SSL.


Required Parameters

-domains
  • Type: String (multiple, array)
  • Description: List of mail domains to query.
  • Example: “contoso.com”,”gmail.com”
-outputDirectory
  • Type: String (directory path)
  • Description: Path to where the reports will be saved.
  • Example: C:\scripts\report


Optional Parameters

-nameServer
  • Type: String
  • Description: Name or IP of the custom DNS Server to use for lookup. If not specified, script will use the local DNS Server IP of the machine.
  • Example: “8.8.8.8”
-logDirectory
  • Type: String
  • Description: Path to where the session transcript log should be saved. Logging will only work if this is specified.
  • Example: C:\scripts\log
-headerPrefix
  • Type: String
  • Description: String that will appear in front of the report title or email subject. Can be any string value.
  • Example: MyCompanyName
-sendEmail
  • Type: String
  • Valid values:
    • Always – Send email report everytime.
    • OnError – Send email report only when there’s a failed lookup result.
  • Description: If specified, the script will trigger sending of the report through email.
  • Example: –sendEmail Always, –sendEmail OnError
-sender
  • Type: String
  • Description: The email address that will appear as the sender of the email
  • Example: sender@domain.com
-recipients
-smtpServer
  • Type: String
  • Description: The IP address, Hostname, or Fully-Qualified Domain Name of the SMTP Relay Server. This parameter is required if -sendEmail is used.
  • Example: smtp.server.com
-smtpPort
  • Type: Integer
  • Description: The SMTP Port Number to be used along with the –smtpServer. This parameter is required if -sendEmail is used.
  • Example: 25
-smtpServerRequiresAuthentication
  • Type: Switch
  • Description: Use if the SMTP server requires authentication to be able to relay messages. There is no need to specify any value for this parameter.
-smtpCredential
  • Type: PSCredential
  • Description: The login credential for the SMTP server authentication. This parameter is required if -smtpServerRequiresAuthenticationis used.
  • Example: $smtpCredential = Get-Credential
-smtpSSL
  • Type: Switch
  • Description: Use this switch if the SMTP Relay connection requires SSL.


Sample Output

HTML Email Summary Report


CSV Report


Share:

Checking Website Up Status using PowerShell

Overview

This script can be used to query a list of sites and produce an HTML report of their status. I created this script in order to get a report of SharePoint sites that my team manage without having to check the site one by one to see if they are up or not.

Download

https://github.com/junecastillote/Get-WebUpStatus

How to use

Modify the configuration file


  • enableDebug (1 = ON, blank = OFF)
    • Enable or disable the transcript logging
  • sendEmail (1 = ON, blank = OFF)
    • Enable of disable sending of the report via email
  • alertsOnly (1 = ON, blank = OFF)
    • Indicates whether the report will only be sent if there are errors
  • mailFrom
    • mail sender address
  • mailTo
    • mail recipient addresses. multiple addresses can be separated by comma
  • mailServerName
    • IP address, hostname or FQDN of the smtp relay server
  • mailServerPort
    • SMTP server port to use. Normally this does not need changing, unless your SMTP server is listening on a different port.
  • sitesListFile
    • this indicates the location of the text file containing the list of sites to query

Run the script

Syntax: .\Get-WebUpStatus.ps1 -configFile


Output

The HTML file report will be created inside the same folder where the script is located


And if the sendEmail parameter is turned on, the same HTML content will be sent via email


Use as Scheduled Task

If you plan to use the script with Task Scheduler, here's a sample reference.


Program/script: 
powershell
Arguments: 
-command C:\Get-WebUpStatus\Get-WebUpStatus.ps1 -configFile C:\Get-WebUpStatus\config.xml

End of Post

Please report issues in the Github repository.
Share:

Popular Posts

Powered by Blogger.