Showing posts with label Tools. Show all posts

Office 365 Mailbox Forwarding Rules Report using PowerShell

Being on top of who’s forwarding messages to who’s email, especially those being forwarded to external domains is essential to email security for administrators. Phishing attacks can leave your users’ mailboxes prone to data exfiltration by way of forwarding emails, and so being able to regularly review and audit mailbox forwarding rules is beneficial to protecting your company’s data.
This script can be used to export a report of all the forward/redirect rules present in all user mailboxes.

Download Link

https://github.com/junecastillote/Export-ExoMailForwardRules


Requirements

  • Must have an Office 365 account that is assigned at least an Exchange Administrator role whose credentials will be used to connect to Office 365 PowerShell.
    • It is important that the account is not MFA enabled as the script operates by paging and re-authenticates to Office 365 page.
  • Must have a mailbox to be able to send the email report using Office 365 SMTP Relay. This could be the Service Account you’re using for the session, or a Shared Mailbox that the Service Account has Send As permission to. If you do not plan to send the report thru email, then you can disregard this requirement.


How to use

Setup Office 365 Credentials

  • Open PowerShell and change to the directory where the script is saved (eg. C:\Scripts\Export-ExoMailForwardRules)
  • Run this command:
  • Get-Credential | Export-CliXml Office365StoredCredential.xml

  • This saves the encrypted credential in the same folder


Modify Variables

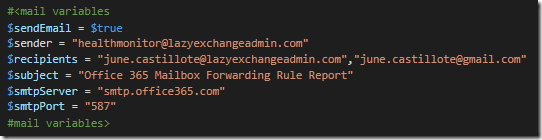
Email Settings


NOTE: The $sender value must be the actual email address of the service account or the shared mailbox used for sending the email report.
Paging

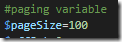
In cases where there are a large number of mailboxes to be processed, the Exchange Online PowerShell session may timeout/disconnect which would cause the script to fail. As a workaround, this script is configured to process the mailboxes in pages. By default, the page settings is set to 100 – which means after every 100 mailboxes processed, the script will re-establish and re-authenticate the PowerShell session. You can increase the page value but it is not recommended to set it too high.

Run the script

The script requires no parameters.


Output

CSV File
The csv file gets saved in the “\Reports” folder


Email

Share:

Enable Mailbox Auditing in Office 365 using PowerShell Script

One of the things that don’t happen automatically when provisioning an Office 365 Mailbox is getting the Mailbox Audit Enabled. This script can be run manually or by schedule to enable auditing on mailboxes.

Download Link

https://github.com/junecastillote/Enable-EXOMailboxAudit


Requirements

  • The Office 365 account to be used to run the script must be assigned an Exchange Administrator role in order to read and set mailbox audit settings.
  • Must have a mailbox to be able to send the email report using Office 365 SMTP Relay


Office 365 Credentials

This script uses an encrypted credential (XML). To store the credential:

  • Login to the Server/Computer using the account that will be used to run the script/task
  • Run this "Get-Credential | Export-CliXml Office365StoredCredential.xml"
  • Make sure that Office365StoredCredential.xml is in the same folder as the script.


Modify Variables

  • $sendEmail – set to $true or $false depending on whether you’d like the report to be send to email
  • $sender – This is the Sender Email Address – make sure this is the email address or the Office 365 Credential you are using for the script.
  • $recipients – These are the recipient addresses. To add multiple recipients, separate with comma.
  • $subject – This will show as the subject of the email report.


Run the script

The script requires no parameters.

Sample Report

Email

CSV

Share:

Monitoring Event IDs using PowerShell

I know that there are 3rd party commercial solutions that can monitor your servers for events IDs. But most of the time these solutions comes with features that you don’t really need and can cost some serious cash. Or maybe your company already have one in place but doesn’t always work as expected, and you could use a custom monitoring script as backup.

This script is for monitoring a list of events ids from local or remote computers. Can be configured to send the report by email or just write to an HTML output.

Download Link

https://github.com/junecastillote/PSEventMonitor

How to Use

Modify the CONFIG.XML file to confirm with your requirements

Modify the “application.txt” to contain the event IDs you need to monitor.

Then you can run the script, no parameters required because it reads the configuration from the XML file.

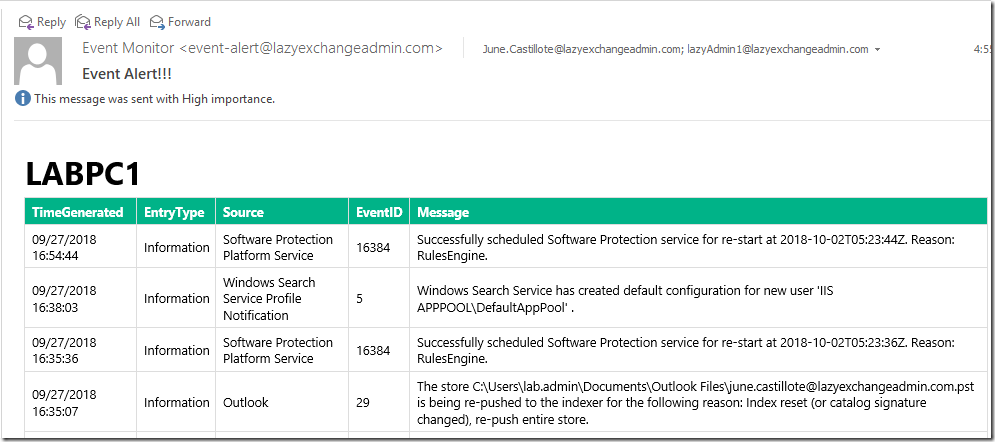
Sample Reports

HTML file

Email

Attribution:

This work is based on the script from this link.

Share:

IMCEAEX to X500 Converter Tool

Tool to convert IMCEAEX String (from NDR) to valid X500 String.

Link: DOWNLOAD


Screenshot:


Share:

Office 365 Service Health Check [.NET]

Tool Overview

The AlertO365 Tool provides a mechanism to check the Office 365 Service Status and Events programmatically eliminating the need to logon to the Office 365 Portal manually. This tool utilize the “Office 365 Service Communications API” as provided by Microsoft.

Reference: https://msdn.microsoft.com/en-us/library/office/dn776043.aspx

The Package

Files and Folders

Name
Type
Description
AlertO365.exe
File
Main executable (no parameter required)
AlertO365.exe.config
File
Contain configuration values used by the tool (XML format)
microsoft.exchange.servicestatus.tenantcommunications.data.dll
File
Office 365 Communications API
report
Folder
First Sub-Folder
Contains the HTML reports
images
Folder
Sub-Folder of the Report Folder
Logo1.png
File
First Logo in the report
Logo2.png
File
Second Logo in the report

Install and Configure

Installation
To use this tool, no special install utility is needed. Just extract/copy the package to any location on the computer/server.

In this example, the tool is extracted and placed under the C:\ drive

Image 1. Folder Structure

Configuration

The configuration file is AlertO365.exe.config, this is in XML format and can be edited using a normal text editor like Notepad.

Image 2. AlertO365.exe.config contents


Fields and Values

ServiceURL – No need to change this. This is a constant value provided by Microsoft in their API documentation

DomainNames – The Tenant Domain to be checked (enter only one domain)

UserName – Username used to authenticate to the Tenant Domain

Password – Password for the Tenant Domain credential

IsAOBO – No need to change this. The function related to this value is not (yet) implemented.

PastDays – Number of days with which the tool would query events for (i.e 1 for the past 1 day)

SenderAddress – Sender address of the email report

RecipientAddress – Recipient addresses of the email report. Separate with comma (,) for multiple recipients

SMTPServer – IP address or resolvable name of the SMTP relay used for sending the email report

MailSubject – The String to be used as Message Subject and Report Title

Company – The company or domain name that will appear in the report

SendViaEmail – Yes or No indicates whether the HTML output will be sent via email or not.

Other Configuration Items

The package contains two images namely Logo1.png and Logo2.png. These images are located under “\report\images” folder. Upon creation of the report, these images will be embedded in the email representing the Client/Company we managed and HP. Before putting the tool in production use, make sure to replace the Logo1.png file with the appropriate logo image for the client/company being managed.


Sample Report

Image 3. Sample HTML Report via Email

How to Use

This is a console-only application which is best executed using the command shell (or can also be double-click in explorer – not recommended).


Can also be executed by Scheduled Task if preferred to run at certain interval (Daily, Hourly, Monthly..)


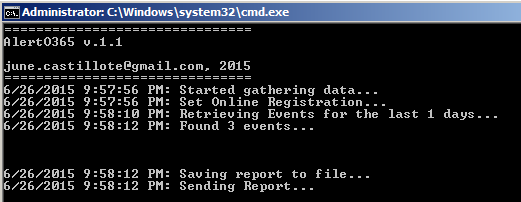
Image 4. Sample Tool Execution


Download and Source Code

AlertO365 1.2 - https://github.com/junecastillote/AlertO365

Note: Download contains source code. If you want to just get the binary output and associated files listed in "Files and Folders" section above, just go to the "bin/Release" folder.


Share:

Backup All Distribution Groups and Members using PowerShell

Someone in the group – either an admin or service desk,  may commit a mistake at some point and delete a distribution group or empty out the members' list. When that happens usually the recovery action is to restore a backup of the active directory. This script can be used to create brick-level backup of distribution groups, so that they can be restored individually.

Download

https://github.com/junecastillote/Export-GroupsAndMembers

Variables

Modify the variables as needed

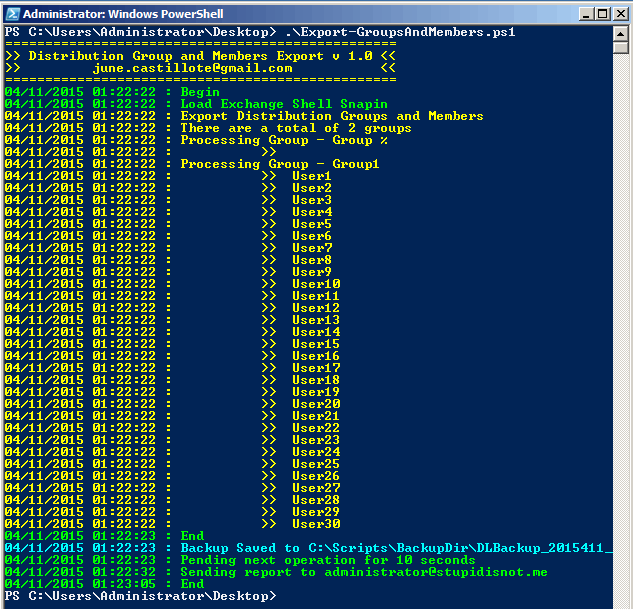
Sample Output

Running the script

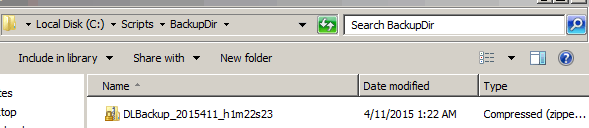
Backup File

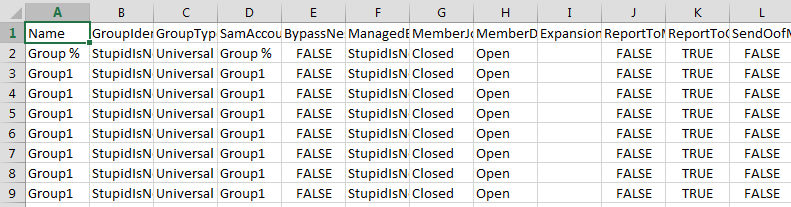
Sample Data

Share:

Exchange Information Store Backup with Cleanup and Email Report

  1. What is MSExchangeISBackup.exe Tool?
This is a customizable program for Exchange Information Store backup purposes.
The tool is only suitable for backup to file operation. (For Exchange 2003)

This program, when executed, calls the native backup capability of the NTBackup utility in Windows to execute a backup task for the Exchange Server Information Store. Additionally, after the backup task is complete, it reads the logs to determine whether the backup was successful or not. Then it performs a purge operation of older backup file based on the retention days specified in the configuration file. A report is also sent to the intended recipients via email. These features eliminate the need to check for completion or successful backup manually; and take care of housekeeping of old backup files based on retention value.

This can also be set as Scheduled Task to run daily or whenever is required.

  1. What are the system requirements?
·         .Net Framework 2.0
·         Windows 2003
·         Exchange 2003

  1. What are the required user permissions?
·         Access to the location/drive/path where the backup files will be saved.
·         The tool is expected to be handled, used and configured by the Administrators.

  1. Where can I get the program?

  1. Installation/Configuration

·         Download and Extract the zip to any folder. In this example, it is saved in C:\MSExchangeISBackup\


·         Create the Backup Selection File using NTBackup.exe
o    Click Start > Run > NTBackup.exe
o    Select the Server and Information Store for backup.


o     Click Job > Save Selection As


o    Save the BKS file. In this example, it is saved in C:\MSExchangeISBackup\DevSvr01-IS.bks


o    Modify the INI file. In this example, we are configuring the config.ini file.

[OPTIONS]

;the path for NTBACKUP.exe
NTBUPathName=C:\Windows\System32\ntbackup.exe

;the folder where the Backup Selection is located. (*.BKS)
BKSDir=C:\MSEXchangeISBackup\

;the filename of the backup selection file
BKSFile=DevSvr01-IS.bks

;the path where the backup file will be saved (*.BKF)
;this coud be a local drive or a network location.
;TAPE is not supported.. yet.
BKFDir=C:\Backup\

;Prefix for the backup filename.
BKFPrefix=DevSvr01_

;File extension for the output backup file. There is usually no need to change this.
BKFExtension=bkf

;How many days to keep the copy of the backup file in the BKFDir location before it is purged.
;Make sure that a MINUS sign comes before the number (eg. -14 for 14 days retention)
KeepDays=-5

;Indicate if backups older than the KeepDays value is purged/deleted. (TRUE or FALSE)
PurgeOld=TRUE

;Indicate if the report is to be sent via email. (TRUE or FALSE)
SendReport=TRUE

;IP or Resolvable name of the SMTP server where the email report will be relayed for delivery.
SMTPServer=192.168.56.250

;SMTP port. Usually 25.
Port=25

;Sender address to reflect as the sender of the report.
Sender=DevSvr01_Backup@labworks.local

;Recipient addresses of the email report. Seperate multiple addresses with COMMA.
Recipient=administrator@labworks.local


  1. Run the program to Backup Exchange Information Store
·         Open Command Prompt and change the path to where the tool is saved. In this example it is in C:\MSExchangeISBackup


·         Issue the command in this format “MSExchangeISBackup.exe [INI File]” .
·         In this example, it is MSExchangeISBackup.exe Config.ini


·         NTBackup.exe will run in the background.
·         The output will be written in the command console.


·         It checks if backup was successful.
·         It will delete older backups based on the retention days specifies in the INI file.
·         The report will be sent via email if it is enabled in the INI.


Share:

Extract List of User Mailbox Data using vbScript

If you need to export a list of user mailboxes (because your boss is making you or you simply have nothing better to do), it is quite an easy task if you have Exchange 2007 and up because of PowerShell snapins.

You can just fire up PowerShell and import the Exchange 2010 Module.

Add-PSSnapin Microsoft.Exchange.Management.PowerShell.E2010

Then:

Get-Mailbox -ResultSize Unlimited | Get-MailboxStatistics | select-object Database, DisplayName, TotalItemSize, TotalDeletedItemSize | Sort-Object Database

Or you can export to CSV like so:

Get-Mailbox -ResultSize Unlimited | Get-MailboxStatistics | select-object Database, DisplayName, TotalItemSize, TotalDeletedItemSize | Sort-Object Database | Export-Csv .\Mailboxes.CSV -NoTypeInformation

But what if you're still in survival mode with Exchange 2003?

You can use this script should you need to extract the list of user mailboxes from one or more Exchange 2003 servers. 

This script will cough-out the following Fields.


  • ServerName
  • StorageGroupName
  • StoreName
  • MailboxGUID
  • MailboxDisplayName
  • LegacyDN
  • Size
  • TotalItems
  • AssocContentCount
  • DeletedMessageSizeExtended
  • StorageLimitInfo
  • LastLoggedOnUserAccount
  • LastLogOnTime
  • LastLogOffTime
  • DateDiscoveredAbsentAbsentDaysInDS
This script reads the list of servers to be queried from a file called ServerList.ini.
Be sure to create this file and populate it with the server names before running this script. 

It runs in this order:

1. Read list of server from ServerList.ini
2. Query each servers and extract information
3. Save information to "ExchangeMBX.txt"

'==========================================================================
'
' NAME: ExtractMBXInfo.vbs
'
' AUTHOR: june.castillote@gmail.com
' DATE  : 10/01/2011
'
' COMMENT: This is for extracting the list of mailboxes from specified servers in the "serverlist.ini" file.
' FILES : 1. ExtractMBXInfo.vbs - main script
'          2. ServerList.ini - file containing the list of servers for the query.
' USAGE  : cscript ExtractMBXInfo.vbs
'==========================================================================

Option Explicit

On Error Resume Next

Dim t1, t2, t3, d1, d2, d3

Dim strComputer

'==========================================================================

Dim FileToWrite, FileToRead, fsoWrite, fsoRead

Set fsoWrite = CreateObject("Scripting.FileSystemObject")
Set fsoRead = CreateObject("Scripting.FileSystemObject")

Set FileToWrite = fsoWrite.CreateTextFile("ExchangeMBX.txt")
Set FileToRead = fsoRead.OpenTextFile("ServerList.ini")

Dim objWMIService
Dim colItems
Dim objItem
Dim i

'Header row
FileToWrite.WriteLine "Server" & vbTab & "Storage Group" & vbTab & "Mail Store" & vbTab & "Mailbox GUID" & vbTab & "Display Name" & vbTab & "LegacyDN" & vbTab & "Size" & vbTab & "Item Count" & vbTab & "Associated Content Count" & vbTab & "Deleted Message Size" & vbTab & "Date Absent" & vbTab & "Storage Limit Level" & vbtab & "Last LogOn Account" & vbtab & "Last LogOn Time" & vbTab & "Last LogOff Time"

'Iterate through the list of servers
Do While Not FileToRead.AtEndOfStream
     strComputer = FileToRead.ReadLine()
     WScript.Echo Now & " : Connecting to " & strComputer
     Set objWMIService = GetObject("winmgmts:" _
        & "{impersonationLevel=impersonate}!\\" & strComputer & _
            "\ROOT\MicrosoftExchangeV2")
   
    WScript.Echo Now & " : Running Query on " & strComputer
    Set colItems = objWMIService.ExecQuery _
    ("Select * from Exchange_Mailbox")
   
    For Each objItem in colItems
        If objItem.LastLogOnTime <> "" Then
            t1=WMIDateStringToDate(objItem.LastLogonTime)
        Else
            t1 = ""
        End If
       
        If objItem.LastLogOffTime <> "" Then
            t2=WMIDateStringToDate(objItem.LastLogOffTime)
        Else
            t2 = ""
        End If
       
        If objItem.DateDiscoveredAbsentAbsentDaysInDS <> "" Then
            t3=WMIDateStringToDate(objItem.DateDiscoveredAbsentInDS)
        Else
            t3=""
        End If           
       
        FileToWrite.WriteLine objItem.ServerName & vbTab & objItem.StorageGroupName & vbTab & objItem.StoreName  & vbTab & objItem.MailboxGUID & vbTab & objItem.MailboxDisplayName & vbTab & objItem.LegacyDN & vbTab & objItem.Size & vbTab & objItem.TotalItems & vbTab & objItem.AssocContentCount & vbTab & objItem.DeletedMessageSizeExtended & vbTab & t3 & vbTab & objItem.StorageLimitInfo & vbTab & objItem.LastLoggedOnUserAccount & vbTab & t1 & vbTab & t2
    Next
Loop
WScript.Echo Now & " : End - Saved to ExchangeMBX.txt"

'To convert WMI time to Standard time format
Function WMIDateStringToDate(dtmInstallDate)
    WMIDateStringToDate = CDate(Mid(dtmInstallDate, 5, 2) & "/" & _
    Mid(dtmInstallDate, 7, 2) & "/" & Left(dtmInstallDate, 4) _
    & " " & Mid (dtmInstallDate, 9, 2) & ":" & _
    Mid(dtmInstallDate, 11, 2) & ":" & Mid(dtmInstallDate, _
    13, 2))
End Function

FileToRead.Close
FileToWrite.Close
Set FileToRead = Nothing
Set FileToWrite = Nothing


Share:

Export List of User Mailbox with Size information in Lotus Domino

One would think that there is a function in Domino Admin client to export a list of database with their corresponding size information. Well, as simple as the concept might be, there is no built in tool to do just that. If the mailbox quota/size statistics is crucial for your organization for capacity planning or just for record purposes, you can always leverage the LotusScript to export these information.

Note that in this example, it is expected that you are already familiar with using Lotus Notes Designer and LotusScript.

Create the Appplication
1. Create a blank application and place it in your "data" folder.
2. Create a Form and add a Button.


3. Add your code to the Button's click event.

================================
 Sub Click(Source As Button)
    On Error Resume Next
  
    Dim oQuota As Integer
    Dim oWarning As Integer
    Dim oTotal As Integer
    Dim oTotalSize As Double
  
    Dim db As NotesDatabase
    Dim f As Integer
    f = Freefile
    Open "c:\DBlist.txt" For Output As #f
  
    Dim dbdir As New NotesDbDirectory("RSBDOM01/RSBPH")
    Set db = dbdir.GetFirstDatabase(DATABASE)
    Print #f, "Title" & Chr$(9) & "FileName" & Chr$(9) & "Size" & Chr$(9) & "Quota" & Chr$(9) & "Warning"
    While Not(db Is Nothing)
        If Instr(1,db.FilePath,"mail\",5)>0 Then
            Print "Getting Info: " & db.Title
            Print #f, db.Title & Chr$(9) & db.FileName & Chr$(9) & db.Size & Chr$(9) & db.SizeQuota & Chr$(9) & db.SizeWarning
          
            oTotal=oTotal+1
            oTotalSize=oTotalSize+db.size
          
            If db.size/1024 > db.SizeQuota  Then
                oQuota=oQuota+1              
            Elseif db.Size/1024 > db.SizeWarning Then
                oWarning=oWarning+1              
            End If  
        End If  
        Set db = dbdir.GetNextDatabase      
    Wend
    Print "Export Complete"
    Messagebox("Overquota: " & oQuota & Chr$(13) & Chr$(10) & "Warning: " & oWarning & Chr$(13) & Chr$(10) & "Normal: " & oTotal-oQuota-oWarning & Chr$(13) & Chr$(10) &  "Total Mail Files: " & oTotal  & Chr$(13) & Chr$(10) & "Total Size: " & Format(oTotalSize/1024,"Standard") & " KB")
    Close #f
End Sub


================================
4. Create a Frameset and add the Form to one of the Frames.
5. Set the Frameset to show once the Database is opened.
6. Save the Application and name it whatever you want.

Output

It shows the summary in a Message Box:
 

And it saves a text file of the raw data in tabular form which you can use for data manipulation in Excel


Just a simple demonstration of reading database properties using LotusScript
Share:

Add User or Group as Member of Local Group During User Logon

These two little people at work asked me if I could help them with this script to automatically add a domain user or group to the local administrators group. Just thinking about how they've been trying to do it for weeks already with no success was enough challenge for me; so without really thinking if it would fit in my workload, I agreed to help these little guys.

The assumptions:
  1. Script will run during computer startup.
  2. GPO will be applied to specific computers
I whipped up this script and added it to the Computer Startup section. After testing and verifying that it worked, they suddenly changed their minds.

New requirements:
  1. GPO will NOT be restrictive to any specific computer but;
  2. GPO will NOT be applied to ALL computers. (Should only be applied to a computer if the member user logged on to it)
So I didn't have a choice but to implement the GPO on User Logon which posed another challenge; user logon scripts run under the credentials of the user who logged on.. and if the user don't have local administrator privileges the script will just fail with "access denied" error.

Hitting that wall, the obvious workaround was to use impersonation inside the script which means using an account that have Domain Admin privilege to run the WMI code in the script. That however, is a very bad idea because doing that requires to have the username and password incorporated in the code, the code which is in plain text.

So the new challenge now:
  1. Run the Logon Script with Domain Admin privileges.
  2. The end-product of the code must NOT be in plain-readable-text to protect the account from being compromised.
Encrypting the VBS to VBE is not a very considerable option. Why? Because ever since I started learning VBS, I have decrypted lots of VBE's so that I can study them.. and the Decryption mechanism is always the same.

The only way to go for me is to compile the vbScript into an EXE binary.
This is where PrimalScript came in handy.

THE CODE

'==========================================================================
'
' NAME: AddToLocal.vbs
'
' AUTHOR: June Castillote, june.castillote@gmail.com
' DATE  : 3/22/2012
'
' USAGE: AddToLocal.vbs [Domain Group/User] [Local Group]
'
'==========================================================================
Set objArgs = WScript.Arguments

If objArgs.Length=0 Then WScript.Quit '<--------- font="font" if="if" not="not" run="run" script="script" size="2" will="will">no arguments specific


Const strComputer = "."
Dim objNetwork, objGroup, objUser, strUsername, strGroupName
Set objNetwork = WScript.CreateObject("WScript.Network")
strGroupName = CStr(objArgs(0))
Set objGroup = GetObject("WinNT://" & strComputer & "/" & cstr(objArgs(1)))
Set objUser = GetObject("WinNT://" & strGroupName)
If (objGroup.IsMember(objUser.ADsPath) = False) Then
    objGroup.Add(objUser.ADsPath)
    MsgBox    "Your account/group " & CStr(objArgs(0)) & " has been added to the Local " & cstr(objArgs(1)) & " Group. Please logout and log back in for the privileges to take effect"
Else
    MsgBox    "Your account/group " & CStr(objArgs(0)) & " is already a member of the Local " & cstr(objArgs(1)) & " Group. No further actions needed."
End If 

'========================================================================== 


COMPILE USING PRIMALSCRIPT


Enter the account that is already a member of the Local Administrator (usually a domain admin account) the the script will use as "Run As" credential


APPLY TO GPO

You should know how to do that!

OUTPUT


If the user logged in on that computer is not a member of the local group yet, the script will trigger and will see the message box below.


If the Account/Group is already added to the local group, the message box below will appear.


PrimalScript is a commercial software however, if you do not want to use this option of compiling to EXE, you can just modify the script to include the Username and Password in the WMI string - which exposes your the credentials in plain text.


Share:

Popular Posts

Powered by Blogger.