Recursive Mailbox Full Permission Report Using PowerShell


exchangeMailbox Permissions may include Users and Groups, and sometimes even nested groups. And if you were tasked to get a report listing all those permissions, it would be a very tedious process to manually look up each entry. This script can help generate the needed report based on a file with a list of mailboxes are input file, all mailboxes, or just a single mailbox.


The Script

Variables

Variables

Depending on what your requirements are, you can change the value of the variable $mailboxList. The descriptions are already stated after each option.

Input File for Option 1

Should you choose OPTION 1, which is to use an input file named mailboxlist.txt, the file must first exist and contain the list of the acceptable identity values like SamAccountName, PrimarySMTPAddress, Alias or UserPrincipalName to name a new.

The example below shows the file containing the PrimarySMTPAddress values.

Running the Script and the Outputs

Running the script requires no parameters. All you need to do is run it in your normal PowerShell session (not EMS or Remote Shell).

On Screen

The screen output shows which mailboxes are currently being processed. Each permission will be listed below the current mailbox, and the mailbox with no permissions found will be skipped.
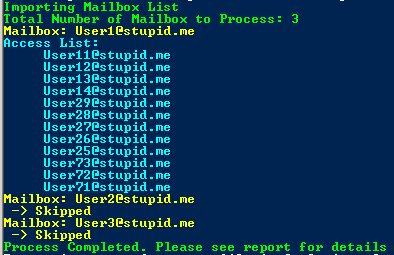
Debug Log

The Debug Log is just a transcript of what was displayed on the screen. The filename format is DD-MMM-YYYY_HH-MM-TT_debuglog.txt and is saved in the same folder as the script itself.

CSV Report

A report in CSV format is exported and saved in the same folder as the script itself. It will always be named “report.csv” and will be overwritten each time the script is executed successfully.

CSV Report Fields

  • MailboxName
    • Name of the mailbox
  • MailboxEmailAddress
    • Email address of the mailbox
  • WhoHasAccessName
    • Name of the user who has access to the mailbox
  • WhoHasAccessEmailAddress
    • Email address of the user who has access to the mailbox
  • AccessType
    • DirectUser – means that the user has direct access permission applied to the mailbox
    • InheritedFromGroup – means that the user has permission because the user is a member of a group that has access to the mailbox
  • ParentGroupName
    • Name of the group that has access to the mailbox
  • ParentGroupEmailAddress
    • Email Address of the group that has access to the mailbox


Download Link

https://github.com/junecastillote/Get-RecursiveFullPermission

Share:

How to Find the Lync/SfB Federation SIP Address of a Domain

Being the Lync / SfB Administrator of your company, you may at times need to look up the Federation SIP Address of another domain. It may happen that a federated partner domain decided to change their SIP Address or perhaps they've migrated their Lync On-Premise infrastructure to O365/Skype Online, and you need to update your own Lync organization with that new SIP Address.
Federation utilizes the SRV DNS record with a specific format, and for this, you can use the good old nslookup utility.

In this example, we are looking for the Federation SIP Address for microsoft.com. The result is sipfed,microsoft.com

C:\>nslookup
> set q=srv
> _sipfederationtls._tcp.microsoft.com
DNS request timed out.
    timeout was 2 seconds.
Non-authoritative answer:
_sipfederationtls._tcp.microsoft.com    SRV service location:
          priority       = 0
          weight         = 0
          port           = 5061
          svr hostname   = sipfed.microsoft.com
>

Looking at the example, the federation sip address always starts with _sipfederationtls._tcp. and followed by the actual domain.

eg.
_sipfederationtls._tcp.amazon.com
_sipfederationtls._tcp.contoso.com

References:
https://technet.microsoft.com/en-us/library/jj618369(v=ocs.15).aspx
http://windowsitpro.com/skype-business/understanding-main-types-federation-skype-and-lync-environments
https://www.petri.com/setup-lync-federation
Share:

Lync Server: Windows Fabric Logs, Disk Space Usage and Circular Logging


If you're not interested in reading the entire post, you can skip to the solution.

I know there have been many articles written and available for this topic. The reason I decided to still write this is to provide more explanation to possible questions that I found myself asking too when I first encountered this situation.

To understand what Windows Fabric is, what is does and how it works you may refer to this link -
"Understanding how Windows Fabric Works (with regards to Lync)"

There are two (2) User Defined Collector sets by default when a Lync Front-End server is deployed.
  • FabricLeaseLayerTraces
  • FabricTraces
You can find these in Performance Monitor


And the default location of the files generated by these data collectors is in C:\ProgramData\Windows Fabric\Fabric\log\Traces folder of each Front-End server.


The screenshot above is from one of the FE Servers in my lab setup. As you can see there are multiple files with approximately 128MB size each. What happens is that once the log file reached a new log file is generated with an incremental version.

eg.
fabric_traces_130374156934210426_007625.etl
fabric_traces_130374156934210426_007626.etl

And there is no limit as to how many of these files are created and can ultimately use up all available free space.

So the questions:

Why the 128MB Maximum file size?

It can be any size really, it's just that 128MB is the default when the data collector was created. You can simply check this using the logman utility.


What triggers the data collector to start?

A Task is scheduled to run at system startup which calls the "StartTracing.cmd" batch file.


Where can I find StartTracing.cmd and how is Task Scheduler able to call it when there is no relative path indicated in the Task?

A relative path (eg. C:\Windows\etc\whatever.exe) is not necessary because the file StartTracing.cmd is located in a path that is already defined in the Environment Variables.


Think of notepad for example which you can run by just typing notepad.exe without having to specify the path - that is the same concept.

How do I stop Windows Fabric from generating multiple log trace files?

The short answer is to turn on Circular Logging.

How? According to this article - http://flinchbot.com/2014/02/28/the-hidden-logs-that-could-crash-your-lync-servers/ - you can turn on circular logging by running this command (from an elevated command prompt)
Logman update trace FabricLeaseLayerTraces -f bincirc --cnf
I did use that article as a guide to enable the Circular Logging for both collectors, but somehow logman still kept on generating new files. I'm not saying that it is wrong, only that some parameters were not included to achieve my intended outcome.

So why didn't it work? That is because despite circular logging being turned on, the versioning is still enabled and the overwrite switch was not specified. In order to really turn on Circular Logging and keep the number of files to 1, this is what I did:

Solution
  • Run these commands in an elevated command prompt:
Logman update trace FabricLeaseLayerTraces -f bincirc --v --cnf -ow
Logman update trace FabricTraces -f bincirc --v --cnf -ow
What do the switches mean?

-f bincrc = turn on circular logging
--v = turn off file versioning
--cnf = turn off creation of new files
-ow = turn on overwrite of existing log file
  • Temporarily stop the logging
logman stop fabricleaselayertraces
logman stop fabrictraces
  • (Optional) Delete the existing log files 
del "C:\ProgramData\Windows Fabric\Fabric\log\Traces\*.*"
  • Start logging
logman start fabricleaselayertraces
logman start fabrictraces
The Result?

Notice that the versioning has been removed.


The same log files will be overwritten every time.

Also, you may want to consider increasing the maximum file size to a much higher value (like 2GB or higher) since there will only one log file for each data collector.
logman update fabrictraces -max 2048
logman update fabricleaselayertraces -max 2048
References:

https://technet.microsoft.com/en-us/library/bb490956.aspx
http://masteringlync.com/2013/10/29/understanding-how-windows-fabric-works/
http://flinchbot.com/2014/02/28/the-hidden-logs-that-could-crash-your-lync-servers/
https://social.technet.microsoft.com/wiki/contents/articles/29408.out-of-disk-space-in-lync-server-2013.aspx


Share:

Delete Files Based on Age using PowerShell

UPDATE: This script has been discontinued. The new version of the script is published here - 
PowerShell Script to Delete Files By Age with Email Summary Report

Share:

IIS SMTP Server Status Check using PowerShell

This script can be used to check and report the status of the Smtp Service and the Virtual SMTP Server created in IIS. For use with Windows 2008+


Sample Report Output


----------------------------

Download 

You can download the script from here:


  • Version 1.1 (GitHub)
    • Removed Local Queue Counter
    • Removed Remote Queue Counter
    • Added Queue, Pickup, Drop and BadMail counter
    • Fixed some formatting issues
    • Replaced CSS Color theme (if you prefer the old theme, just copy the $css_string variable from the older version.
    • Some code optimization
  • Version 1.0 (GitHub)
    • Initial version

To run, no parameters required, just execute the script from PowerShell.


The Variables

Make sure to edit the following variables to conform to your environment or requirements


Share:

IMCEAEX to X500 Converter Tool

Tool to convert IMCEAEX String (from NDR) to valid X500 String.

Link: DOWNLOAD


Screenshot:


Share:

Office 365 Service Health Check [.NET]

Tool Overview

The AlertO365 Tool provides a mechanism to check the Office 365 Service Status and Events programmatically eliminating the need to logon to the Office 365 Portal manually. This tool utilize the “Office 365 Service Communications API” as provided by Microsoft.

Reference: https://msdn.microsoft.com/en-us/library/office/dn776043.aspx

The Package

Files and Folders

Name
Type
Description
AlertO365.exe
File
Main executable (no parameter required)
AlertO365.exe.config
File
Contain configuration values used by the tool (XML format)
microsoft.exchange.servicestatus.tenantcommunications.data.dll
File
Office 365 Communications API
report
Folder
First Sub-Folder
Contains the HTML reports
images
Folder
Sub-Folder of the Report Folder
Logo1.png
File
First Logo in the report
Logo2.png
File
Second Logo in the report

Install and Configure

Installation
To use this tool, no special install utility is needed. Just extract/copy the package to any location on the computer/server.

In this example, the tool is extracted and placed under the C:\ drive

Image 1. Folder Structure

Configuration

The configuration file is AlertO365.exe.config, this is in XML format and can be edited using a normal text editor like Notepad.

Image 2. AlertO365.exe.config contents


Fields and Values

ServiceURL – No need to change this. This is a constant value provided by Microsoft in their API documentation

DomainNames – The Tenant Domain to be checked (enter only one domain)

UserName – Username used to authenticate to the Tenant Domain

Password – Password for the Tenant Domain credential

IsAOBO – No need to change this. The function related to this value is not (yet) implemented.

PastDays – Number of days with which the tool would query events for (i.e 1 for the past 1 day)

SenderAddress – Sender address of the email report

RecipientAddress – Recipient addresses of the email report. Separate with comma (,) for multiple recipients

SMTPServer – IP address or resolvable name of the SMTP relay used for sending the email report

MailSubject – The String to be used as Message Subject and Report Title

Company – The company or domain name that will appear in the report

SendViaEmail – Yes or No indicates whether the HTML output will be sent via email or not.

Other Configuration Items

The package contains two images namely Logo1.png and Logo2.png. These images are located under “\report\images” folder. Upon creation of the report, these images will be embedded in the email representing the Client/Company we managed and HP. Before putting the tool in production use, make sure to replace the Logo1.png file with the appropriate logo image for the client/company being managed.


Sample Report

Image 3. Sample HTML Report via Email

How to Use

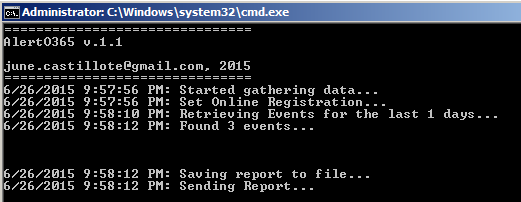
This is a console-only application which is best executed using the command shell (or can also be double-click in explorer – not recommended).


Can also be executed by Scheduled Task if preferred to run at certain interval (Daily, Hourly, Monthly..)


Image 4. Sample Tool Execution


Download and Source Code

AlertO365 1.2 - https://github.com/junecastillote/AlertO365

Note: Download contains source code. If you want to just get the binary output and associated files listed in "Files and Folders" section above, just go to the "bin/Release" folder.


Share:

Backup All Distribution Groups and Members using PowerShell

Someone in the group – either an admin or service desk,  may commit a mistake at some point and delete a distribution group or empty out the members' list. When that happens usually the recovery action is to restore a backup of the active directory. This script can be used to create brick-level backup of distribution groups, so that they can be restored individually.

Download

https://github.com/junecastillote/Export-GroupsAndMembers

Variables

Modify the variables as needed

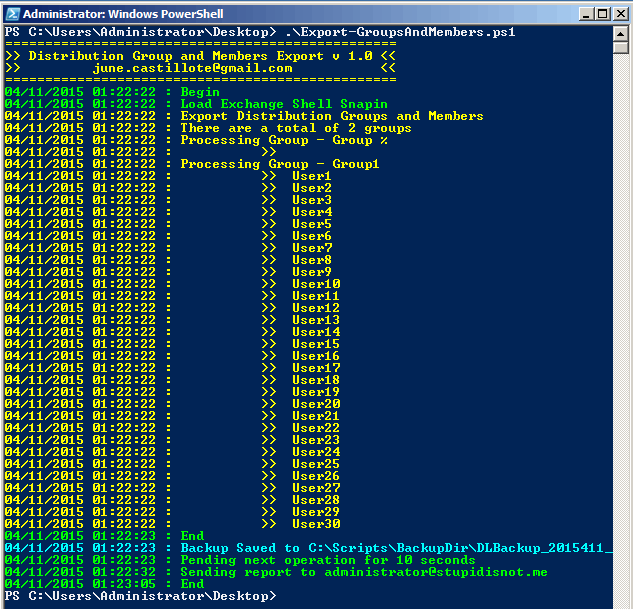
Sample Output

Running the script

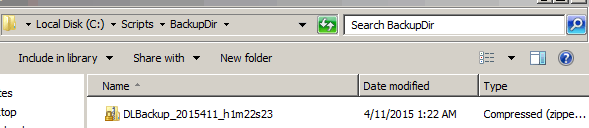
Backup File

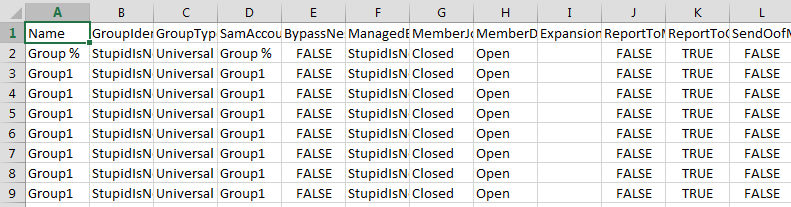
Sample Data

Share:

Exchange Server 2010/2013 Health Check PowerShell Script (v5.4)

A re-work of my previous ExDac utility for Exchange Server 2010 which was written in .NET

Now, this is written in PowerShell instead of VB.net, and as a result, the entire script runs for half the time than the previous tool.

What the script does?

The script performs several checks on your Exchange Servers like the ones below:
  • Server Health (Up Time, Server Roles Services, Mail flow,...)
  • Mailbox Database Status (Mounted, Backup, Size, and Space, Mailbox Count, Paths,...)
  • Public Folder Database Status (Mount, Backup, Size, and Space,...)
  • Database Copy Status
  • Database Replication Status
  • Mail Queue
  • Disk Space
  • Server Components (for Exchange 2013/2016)
Then an HTML report will be generated and can be sent via email if enabled in the configuration file.

I have not tested this for Exchange 2016 but in theory, this should work just as well (let me know if it doesn't).

Sample Output


Parameters

  • -configFile, to specify the XML file that contain the configuration for the script.
  • -enableDebug, optional switch to start a transcript output to debugLog.txt

Configuration File

The configuration file is an XML file containing the options, thresholds, mail settings, exclusion that will be used by the script. The snapshot of the configuration file is seen below:


reportOptions

This section can be toggled by changing values with "true" or "false"

  • RunServerHealthReport - Run test and report the Server Health status
  • RunMdbReport - Mailbox Database test and report
  • RunComponentReport - Server Components check (Exchange 2013/2016)
  • RunPdbReport - For checking the Public Folder database(s)
  • RunDAGReplicationReport - Check and test replication status
  • RunQueueReport - Inspect mail queue count
  • RunDiskReport - Disk space report for each server
  • RunDBCopyReport - Checking the status of the Database Copies
  • SendReportViaEmail - Option to send the HTML report via email
  • ReportFile - File path and name of the HTML Report

thresholds


This section defines at which levels the script will report a problem for each check item

  • LastFullBackup - age of full backup in days. Setting this to zero (0) will cause the script to ignore this threshold
  • LastIncrementalBackup - age of incremental backup in days. Setting this to zero (0) will cause the script to ignore this threshold.
  • DiskSpaceFree - percent (%) of free disk space left
  • MailQueueCount - Mail transport queue threshold
  • CopyQueueLenght - CopyQueueLenght threshold for the DAG replication
  • ReplayQueueLenght - ReplayQueueLenght threshold
  • cpuUsage – CPU usage threshold %
  • ramUsage – Memory usage threshold %


mailAndReportParameters

This section specifies the mail parameters
  • CompanyName - the name of the organization or company that you want to appear in the banner of the report
  • MailSubject - Subject of the email report
  • MailServer - The SMTP Relay server
  • MailSender - Mail sender address
  • MailTo - Recipient address. For multiple recipients, separate the addresses with a semi-colon (;)

exclusions

This section is where the exclusion can be defined.
  • IgnoreServer - List of servers to be ignored by the script. Separate with a comma (,) with no spaces.
  • IgnoreDatabase - List of Mailbox Database to be ignored by the script. Separate with a comma (,) with no spaces.
  • IgnorePFDatabase - List of Public Folder Database to be ignored by the script. Separate with a comma (,) with no spaces.

How to Use

Run manually using Exchange Management Shell


[PS] C:\scripts>.\Get-ExchangeHealth.ps1 -configFile .\config.xml -enableDebug

Note: This must be run within the Exchange Management Shell session. Avoid using this inside the normal PowerShell session, with the Exchange 2010 PSSnapin loaded especially for Exchange 2013 servers.

Task Scheduler

Create a task in Task Scheduler with this action:

Program/script: powershell.exe
Add arguments: -Command ".'C:\Program Files\Microsoft\Exchange Server\V15\Bin\RemoteExchange.ps1'; Connect-ExchangeServer -auto; C:\scripts\Get-ExchangeHealth.ps1 -configFile C:\scripts\Get-\config.xml"

Download

You can find the latest script and config.xml file in this GitHub repository:

Change Logs

Version 5.4 (Latest)

  • Added CPU and Memory Utilization Checks
    • New configuration in config.xml (ramUsage, cpuUsage, RunCPUandMemoryReport)
  • Code clean-up

Version 5.3 (skipped, crappy version)

Version 5.2 (Latest)

  • Several code cleanups
  • Renamed RunDAGCopyReport to RunDBCopyReport (because it makes more sense to call it that)
  • Removed Add-PSSnapin code because it didn't play well with Exchange 2013. Hence the need to use Exchange Management Shell.
  • Added the Version and Edition of Exchange Server column in Server Health report
  • Revised the Get-MailQueues function
  • Added AdminDisplayVersion identification in Get-ServerHealth function
  • Removed PowerShell-Remoting code from the Mail flow test
  • Renamed Get-DAGCopyStatus function to Get-DatabaseCopyStatus
  • Added CopyQueueLenght threshold in XMLconfig file
  • Added ReplayQueueLenght threshold in XMLconfig file
  • Added Server Components check (for Exchange 2013)
  • Added RunComponentReport option in XML config file
  • Added section in XML config file
  • Added IgnoreServer,IgnoreDatabase,IgnorePFDatabase fields in XML config file
  • Added counter for the number of tests, passed and failed.
  • Added percentage computation for overall health
  • The "Issues" table is not visible from the report if there are no actual issues detected
  • Added individual test results summary
  • Added logic to not run DAG checks if there are no DAGs
  • Added logic to not run Mail Flow test against Mailbox Servers with no Active Mailbox Database

Version 5.1

  • Added new parameter "configFile" where you will need to specify the configuration XML file which contains the variables that used to be included inside the script in previous versions.
  • Moved the Variables to an outside XML file (default is config.xml) You can create different XML files with different configurations/variables if desired.
  • To run: "Get-ExchangeHealth.ps1 -configFile config.XML"
  • Added DAG Copy Status
  • Fixed the Math for getting back up age

Version 4.4b

  • Corrected version information within the script
  • Added BCC and CC line within the @params variable block, but are commented out.
  • Added comments to:
  • [int]$t_lastincrementalbackup
  • [int]$t_lastfullbackup
  • Added comments to:
  • $MailCC
  • $MailBCC

Version 4.4

  • Added Test-MailFlow Handle for Exchange 2013
  • Moved Test-MailFlow Result to Server Health Status Report
  • Exclude Edge Servers from Testing
  • Public Folder Database Report will not run if database count is 0

Version 4.3

  • Renamed script to Get-ExchangeHealth.ps1
  • Added Test-MapiConnectivity
  • Added Test-MailFlow
  • Added Services Status
  • Added DNS/Ping Test
  • Added Server Up Time
  • Changed Backup Threshold from Days to Hours

Version 4.0

  • Added DAG Members Replication Checks
  • Added Mail Queue Checks
  • Added DB Activation Preference Check
  • Added "Summary" Section
  • Fixed HTML character recognition issues

Older versions --- :)

Share:

Exchange Information Store Backup with Cleanup and Email Report

  1. What is MSExchangeISBackup.exe Tool?
This is a customizable program for Exchange Information Store backup purposes.
The tool is only suitable for backup to file operation. (For Exchange 2003)

This program, when executed, calls the native backup capability of the NTBackup utility in Windows to execute a backup task for the Exchange Server Information Store. Additionally, after the backup task is complete, it reads the logs to determine whether the backup was successful or not. Then it performs a purge operation of older backup file based on the retention days specified in the configuration file. A report is also sent to the intended recipients via email. These features eliminate the need to check for completion or successful backup manually; and take care of housekeeping of old backup files based on retention value.

This can also be set as Scheduled Task to run daily or whenever is required.

  1. What are the system requirements?
·         .Net Framework 2.0
·         Windows 2003
·         Exchange 2003

  1. What are the required user permissions?
·         Access to the location/drive/path where the backup files will be saved.
·         The tool is expected to be handled, used and configured by the Administrators.

  1. Where can I get the program?

  1. Installation/Configuration

·         Download and Extract the zip to any folder. In this example, it is saved in C:\MSExchangeISBackup\


·         Create the Backup Selection File using NTBackup.exe
o    Click Start > Run > NTBackup.exe
o    Select the Server and Information Store for backup.


o     Click Job > Save Selection As


o    Save the BKS file. In this example, it is saved in C:\MSExchangeISBackup\DevSvr01-IS.bks


o    Modify the INI file. In this example, we are configuring the config.ini file.

[OPTIONS]

;the path for NTBACKUP.exe
NTBUPathName=C:\Windows\System32\ntbackup.exe

;the folder where the Backup Selection is located. (*.BKS)
BKSDir=C:\MSEXchangeISBackup\

;the filename of the backup selection file
BKSFile=DevSvr01-IS.bks

;the path where the backup file will be saved (*.BKF)
;this coud be a local drive or a network location.
;TAPE is not supported.. yet.
BKFDir=C:\Backup\

;Prefix for the backup filename.
BKFPrefix=DevSvr01_

;File extension for the output backup file. There is usually no need to change this.
BKFExtension=bkf

;How many days to keep the copy of the backup file in the BKFDir location before it is purged.
;Make sure that a MINUS sign comes before the number (eg. -14 for 14 days retention)
KeepDays=-5

;Indicate if backups older than the KeepDays value is purged/deleted. (TRUE or FALSE)
PurgeOld=TRUE

;Indicate if the report is to be sent via email. (TRUE or FALSE)
SendReport=TRUE

;IP or Resolvable name of the SMTP server where the email report will be relayed for delivery.
SMTPServer=192.168.56.250

;SMTP port. Usually 25.
Port=25

;Sender address to reflect as the sender of the report.
Sender=DevSvr01_Backup@labworks.local

;Recipient addresses of the email report. Seperate multiple addresses with COMMA.
Recipient=administrator@labworks.local


  1. Run the program to Backup Exchange Information Store
·         Open Command Prompt and change the path to where the tool is saved. In this example it is in C:\MSExchangeISBackup


·         Issue the command in this format “MSExchangeISBackup.exe [INI File]” .
·         In this example, it is MSExchangeISBackup.exe Config.ini


·         NTBackup.exe will run in the background.
·         The output will be written in the command console.


·         It checks if backup was successful.
·         It will delete older backups based on the retention days specifies in the INI file.
·         The report will be sent via email if it is enabled in the INI.


Share:

Popular Posts

Powered by Blogger.